Saturday, December 29, 2012

Shaded Baby Blanket While Ruby Naps

     I am a sucker for unique baby stuff.  After having my own I really began to appreciate anything that wasn't the cookie cutter stuff at Target and Walmart.  Theses baby quilts are car-seat sized, the same size as an average receiving blanket, you can snuggle them around your little peanut in the car without having yards of quilt dragging on the ground, they make perfect 'night-night' blankets and are more than sturdy enough to handle the washes that will come their way,
  for this project you will need:
  • one pack of varied shades on fabric (they are about six dollars at hobby lobby and come in many color families)
  • scissors/ rotary cutter
  • ruler
  • 1 yard of batting
  • 1 yard of flannel or micro fleece for backing (for snuggly warmth, cotton would work for a lighter version)
      Pre-wash your fabric!!!!! for quilts this is very important, skip this step and your entire project is ruined once you throw it in the wash.
  I iron my fabrics once they are out of the dryer, this is mostly to help me when I am cutting, the flatter the fabric the easier it is to cut accurately with the rotary cutter.
   I used a template for 4 inch squares and used a 1/4 inch seam allowance. I cute out as many squares as I could from each color, I like to be able to play with my layouts until I find one that I like.

   Once I find a lay out i like i pin the squares together in strips then sew them.  Whatever seam allowance you are comfortable with, use, just make sure you keep it the same throughout the entire quilt. 
    When you have finished your strips pin them together, matching up the corners of the squares as you go, then just sew them together to finish your facing!  Press the seams open for a crisp look.
   Cut batting to the size of your facing, then doing the same with the flannel backing.  Put the backing fabric right side to the right side of the facing. then lay the batting ontop of that. 
     Sew the three layers together leaving a 3 inch gap, then use that gap to turn the quilt right side out.  Iron the quilt flat and sew down the edges.  I always use a decorative stitch for my edging stitch.  I turn in the 3 inch opening and sew it down when I am doing the edge stitching.  
This is a great opportunity that have some fun with contrast thread, if you are comfortable with your stitches I recommend it for some extra pop.

     
if you don't feel like sewing you can buy one of these here:

http://www.etsy.com/shop/RubyKei

Hair Bow Holder While Ruby Naps

My little girl has crazy curls. I adore them, but combing isn't going to make them look particularly presentable so ever since it got long enough I have been trying to tame them with the salon clip hair bows.  I have many,  to fit each outfit and mood. But they get scattered throughout the house and I have to search everywhere for one. 
I found a hairbow holder in the store and laughed as I walked away from its 20$ price tag.  That was when I decided to make one my self.
You will need:
Fabric (size is up to you)
Wood or cork board to cover
Ribbon
Staple gun or hot glue gun

I bought a wooden disc from hobby lobby for 1$ and used scrap fabric and ribbon.  I cut a circle around the wooden disc with two inches extra then hot glued the fabric tight around the wood, covering one side completely.  I wanted a simple hair bow holder so I just went with an X, you can get as creative as you like with your ribbon placement.  I hot glued the ribbons to the back side of the wooden disc.
 I had to make sure that they were securely fastened,as this is where the hair-bows will be clipped to. I used my staple gun to secure the hanger to the upholstered disc.  I am pretty happy with how it turned out, however I might make another one that will actually match her room, she has blue sparkly stars, the pink and black polka dots are a bit out of place......
I would LOVE to see any other homemade hair-bow holders!  Show me how yours turned out!

Tuesday, December 25, 2012

Reversible Aprons While Ruby Naps


 I adore making custom projects.  It shakes up my design process and I always discover something new.  I like pushing myself, so when someone asked me to make their love of football into a fun reversible apron I was excited for a challenge.
      I personally am not into football. I know that in Texas that may be a jail-able offense but I just don't get it (unless its an episode of friday night lights, then I am glued to the screen).  That became a slight problem when I was asked to make an apron for an avid fan of Texas sports. 
      She wanted two reversible aprons, one for her college team and one for her pro team. I felt like I was jumping into unknown territory, it may sound silly but I was worried I wouldn't have the right taste to work with the material, making flowers and swirls look nice is different than football logos.
       First hurdle to clear was fabric, the official team fabric is expensive! 11-13 dollars a yard! I always like to get more fabric than absolutely required in case of mistakes but with prices like that buying extra isn't always possible.  If you are trying this yourself you may want to look into just buying the team colors and using the combination to rep your team instead of the logo fabric.
       I went to hobby lobby (they stock the local team fabric) and picked up two variations of logo-ed Texas longhorns patterns and one for the Dallas cowboys .  I sent a picture of the fabrics to her and she loved them, so much so in fact that she changed her mind and wanted two separate reversible aprons, one for each team!  This was problematic because I had purchased enough of the long horns print  to do one side of an apron, not both sides of a reversible! However, being forced to use what I had influenced the finished design in a great way! 
      For the first apron I used 1/2 yard of one logo pattern and 2/3 yard of another, just to have some contrast.I was able to incorporate a little of my patch work quilting into the design to best make us for any scraps of fabric  (this turned out to be the literal exact amount needed The only scrap I have is two inches long and an inch and a half wide yikes!) If you ever try this, just to be safe get a yard of the two main fabrics you will want to work with (you will have quite a bit extra, maybe you can make a pot holder set to match your apron!)
      Aprons are fun because you can create your own pattern with ease. I will put up an in depth tutorial for it after I catch up on work that piled up during this holiday season.  
     This project was great for so many reasons, I learned that reversible aprons are easier and less time consuming than one sided and I was able to mix in a couple cool design elements, like braiding the ties and patchwork edging!  Working with the logos was also a great experience, it forces me to pay attention to where on the fabric I am cutting and can even become a design element of its own.
     She loved the aprons and I have to say so do I!


Saturday, December 22, 2012

New Location For While Ruby Naps

I have moved While Ruby Naps from the website because it is much easier to update from here,so I will be able to do it more often! I have transferred all my old posts so if you are looking for one it should be here!  Share the new location with your friends, thank you!
You can still find RUBYKEI originals at www.etsy.com/shop/rubykei   or on facebook at www.facebook.com/rubykeiworks!

Tree Ornaments While Ruby Naps


     I am still in love with my glitter foam wreath! but my tree was a little bare so I used my scraps and some clothes pins to make so glittery goodness for our little tannenbaum. With most Christmas ornaments running around 8$ a piece this has saved me money for Santa to use later and has done good work in ratcheting up my holiday spirit!
   you will need
           clothes pins (1$ for a bag of 24)
Glitter Foam sheets (97 cents each at hobby lobby I got two of each color and have a TON of extra even after the wreath and ornaments)
sharpies (draw on snow man details)
scissors
glue

****this craft is great for kids too (although you way want to use Elmer's glue instead of a hot glue gun for the kiddies)*****
We used cookie cutters to make imprints on the back of the foam before we cut it out, made it easy and helped because drawing is not my strong suit!   You can also find patterns for shapes and such online.
      we did:
   snow men
   gingerbread men
   stars
Christmas trees
Wreaths
   
I absolutely love how they turned out. the glitter looks great on our tree when the lights are on!


the whimsical tree with the moon is my favorite but cutting it out took forever!

Christmas Wreath While Ruby Naps


    This year has had many firsts for me.  I had my first child, I had my first wedding anniversary, it was the first year I cooked my own thanksgiving turkey (that was quite an adventure) and the list goes on.  Through this year isn't technically my first Christmas married and in my own house I have decided not to count last year because I was 8  months pregnant and on bed rest so I couldn't do the holiday justice. 
      I wanted to go all out but at the same time I didn't want to have to sell my kidney and left toe to pay for both decorations and gifts this year so I decided that this was a job for my glue gun!  I will be putting up a couple posts of my projects for this years Christmas extravaganza!

       The first decoration I wanted to tackle was a wreath.  The ones in target cost 25$ so tonight while my sweet baby slept I made one that I am in love with for less than 3 $                                            

 you will need:
glittery foam sheets (99cents each)
glue gun or normal glue and patience 
shape to trace


     I got some glitter foam sheets from hobby lobby.  They were 99 cents each and its take half of two sheets to make my wreath (the rest I am using for more decorations!) 
      I used an old music box shaped like a bell to trace circles onto the foam sheets to cut out my Christmas baubles, but you can use anything, even cookie cutters! the impression they leave in the foam would help you save time by skipping the tracing step! I cut nine circles of each color out.
     
 Then I cut the middle out of a paper plate for my wreath form and laid out the circles in couple different patterns before I found the one I wanted.  
     
       After you find a pattern you like start gluing it down! ( Have a chop stick or something the press down on any places that may have oozing hot glue, I always seems to put my fingers into pools of molten glue no matter what the project). I also added a braided ribbon to the top of mine to hang on the door.
     and simple as that I was done!  you can make yours more fancy with ribbons or by mixing colors and shapes but I was really taken with my simple alternating circles!


Dont throw away your extra scraps from your glitter foam, I am posting on how to turn those into tree ornaments tomorrow!
preview

Coasters While Ruby Naps


     Today I found myself in a cleaning frenzy so my usual sewing time was spent rug doctoring my carpets.  (It was awful, I now know for sure that our rental company did NOT have our carpets cleaned before we moved in).  But come bed time my husband still was still on a 24 hour shift so I found myself with an hour to kill and pintrest boards staring at me.  
      I have a large stash of scraps and my sewing machine is feeling over worked so I tried a coaster idea they had.  I decided to change it up, putting scrapbook paper on a tile for drinks with condensation seemed like poor planning so I replaced the scrap book paper with scraps from my fabric stash and instead of stick on felt I cut and glue gunned my own.
      What you will need for this project is:
                            Tiles (13 cents from Home Depot)
                            Felt (25 cents a sheet you can get 4 bottoms a sheet)
                            Glue Gun
                             Fabric Scraps
                             ModgePodge
                             Scissors

First:
*****be careful not to glue your fingers*****
Start with the felt on the bottom (this way you can get more done without waiting for the modge podge top to dry) Glue gun the felt on to the rough bottoms  I cut a pieces that were slightly too big and then trimmed them after they were glued.  Make sure that you glue the very edges and fill in a couple of the rectangles but don't over do the glue, felt is porous and could ooze. They sell felt stick ons but they don't cover the whole bottom and are more expensive so I opted to break out the glue gun.  

Next:   
     Flip over the tile so that the smooth top is up.  Cut a scrap of fabric slightly too big like you did with the felt.  Put a decent layer of modge podge on the tile making sure that there is enough around the edges.  Press the fabric on top of it and make sure there are no wrinkles or air bubbles.  Set it aside and start on another one.  
  
 Once the fabric is fairly dry (it might still be a little tacky but that's not too big a deal) trim off the edges as close as you can, then add another layer of modge podge, make sure you get the edges so that your fabric doesn't fray at all.
Let it dry and you are done!
I made several different coasters, a set of four and then some odd balls. I love the way they turned out.

It may not have technically been during nap time but it was a fun and productive way to spend an hour!  (plus I got to catch up on Scandal while I did it!)


UPDATE:  I found a fun way to make it even more interesting, make your coasters mini quilts! just be generous with your first layer of modge podge and make sure your pieces will come together! here are the new ones!


If you make your own send me a picture I would love to see what you came up with!


Queen Sized Quilt While Ruby Naps


My husband and I were apart due to military service when we were first getting started, with both of us at different duty stations he got to pick out most of our furniture and home decor without me. For the most part he did an excellent job, but then there was our bedroom comforter. He had asked me what color I wanted and I said red, envisioning deep crimson or a rich 'red like you mean it' red. When I finally joined him in our apartment I found that I was looking at more of an orangey red with brown stripes in several different shades. Not my cup of tea, but it was warm and it worked and being 7 months pregnant I had bigger fish to fry. Now that my daughter is 8 months old however I am going to put the sewing machine he got me for Christmas to good use! 
       If you are looking to try quilt
            First thing when making a quilt you need to pick out the fabric for your facing, personally I like classic elegant colors so I went with white, black, and a black and white print. (a woman in Joann Fabric once told me you need a light color a dark color and an in-between and that advice has been pretty spot on). I have a fear or running out of fabric in the middle of a project so I got two yards of each color (my bed is queen sized so it turns out i only had just enough!) *update- I actually ran out of black! I was an inch short! had to improvise*
Then throw those fabrics right into the wash. Pre-washing when quilting is essential! I forgot to do it on half of my fabrics for a recent project. I didn't realize my mistake until the binding had been back-stitched. A baby quilt that cant be washed doesn't make much sense so now I have a nice wall hanging.
Either pull then fabrics right out of the dryer or give them a quick swipe with the iron, the less wrinkles there are the better your squares will look!  I decided on six inch squares, you can go smaller or bigger but for me the six inch is the most versatile. I use four inch squares for baby projects.  I cut half of each color of fabric into squares and then clear off a spot on the floor to do a little brainstorming.

To start off any project I usually have something in mind but I like wiggle room as I go, so I test out different layouts to see what kind of design I like best .

After I pick a design I pin down the squares in strips, I started off with my core and decided to build around.  Each strip was ten strips long and I started sewing when I had ten strips pinned . To pin I put the fabric 'right side' to 'right side' in a line.  That is where using squares makes things very simple, unless the fabric you pick has a direction you cant accidentally pin it wrong unless you pin it backside up!

      At the sewing machine I make sure I have a full bobbin and full spool of matching thread.  (I went with black, since I had such contrasting colors I picked the one I liked best) Then I pick a seam allowance, I generally use a 3/8 seam but its really about personal preference, what is important is that you use the same one throughout the project!  
      Once my strips are sewn  I iron the seams flat, not required but it helps make things look sharp.  The best way to do that is put your project face down on the ironing board, open the seam so you can see the 'right side' of the two sewn together fabrics and iron them so they are 'open'. I pin them together pining each seam to its corresponding seam on the other strip, on patchworks with diagonal strips this helps to keep your pattern true.  
      All the sewing is just straight lines so you can do beautiful work with just basic skills.  My original layout was way smaller than queen size so I built around it using four strips of sewn together squares that increased in length by one square every layer.  I work that way so I can see the clear progress of the quilt to stop myself from feeling stalled. (that stalled feeling is why I have a box of undone projects that stare at me when I start something new).     
      On my last layer of black squares I realized I had a problem.  I was one inch short of having enough squares to make it completely black.  I had plenty of white and plenty of pattern and even plenty of scraps of black but no whole 6 by 6 piece to be found, so I had to change my design a bit, adding patterned squares to the corners.  (Now I have 3 black 6 by 6 squares just kicking around but maybe I will use them to make a matching pillow case.)
     At this point most of the work is done, I iron it flat and go for the batting and the backing.On this particular project I am cheating for the backing, I bought a queen sized sheet and am using that, its cheaper and less labor intensive but you can quilt your backing as well if you are feeling motivated. 
      I sew my quilts like pillows I lay the facing face up lay the backing on top of it face down and the batting on top of that, then I pin and sew, leaving enough room open to turn the project inside out.I turn it inside out so that the facing is on top the back on bottom and the batting in the middle where it belongs.  I iron the quilt flat and then place a stitch (usually a decorative one instead of just straight) around the edge, sealing the hole I left to turn the project right side out.  You can choose to use quilt binding, for some reason I just prefer the pillow method.
     Your quilt is technically done but I like to tack all 3 layers together. On kids quilts I use bright colored yarn, but on this one I will use black to keep  a clean look.  Every other square I stitch a little x into the place where four square come together, very small so that it isn't visible.  Once I am done with that I can lay down and give that quilt a test drive.

Starting an Alphabet Quilt While Ruby Naps


     Today during Ruby's afternoon nap I started on a new quilt.  I had sketched the idea a month or two ago and I was finally ready to jump in.  The main themes are primary colors and the alphabet. When I started cutting squares I had yet to decide if I was going to use applique to letter the blocks or whether I would use the fancy embroidery machine we have.  Then inspiration added another option.
     Midway through cutting out my squares (its an excellent time to gather one's thoughts) I remembered a quilt that my mother had growing up.  It was a true piece of art, white blocks with a deep red grid and on each of the white blocks was a  red hand embroidered picture. Some were flowers, some were animals, or different scenes form around a farm.   (I don't think we have a picture of it sadly) She had purchased it at an estate sale my aunt had been running (she got many amazing quilts and linens this way) it was my favorite blanket in the house and we used it often and still do. In fact, when I was home in New York over the summer my daughter and I sat on it while we played in the front yard, Ruby ran her fingers over the threads of the pictures and drooled happily.  The quilt was so well made that none of the seams gave but now after sixty or more years of heavy use the fabric itself is thread bare and tattering. Despite its beaten appearance it is still a favorite.
  It occurred to me that is the exact kind of life I want my quilt to have.  Many years of service to a family, with memories and love surrounding those that wrap themselves with it as the years go on.

     It was that quilt that inspired me to hand embroider each letter onto my blocks. 
 Although I certainly wont be creating a masterpiece like the one my family spent so many years loving, using, and at times abusing, I like to think that twenty years from now the child that gets my alphabet quilt could give it to their baby.  It is one of my favorite things about what I do, the knowledge that the effort and care I put into a project will mean it can be enjoyed by an entire family for years


Melting Crayons While Ruby Naps

If you have been on pintrest you have seen the melted crayon art. Its colorful,whimsical, and different.  The captions read "hair dryer+crayons= beautiful art!". I think they are super cute and as I can never find anything in stores I like for decorating my little Ruby 's room room I decided to give it a try.  Let me just warn you, it takes longer than you think it will, requires some attention to detail, and you may need more than one pack of crayons.
if you are wanting to do this you will need:
canvas
crayons
hair dryer
drop cloths (it gets splashy)
hot glue gun
painters tape(for your word or design)
patience

I got a crayola 64 pack and a canvass and when Ruby went down for the afternoon I went to work.  I dumped my crayons out on my new table and tried to sort by color. There are these amazing crayon melts that look like the rain or a tree or the curtains of a stage respectively but considering that I bought a relatively large canvass (it was on sale two for one) I did not have enough of one specific color family to do anything like that.  I wasn't about to buy five packs of crayons for this one project, so I decided to melt with all the colors of the wind.
      I hot glued them to the top of the canvas in color order, looking back now there are a couple of shades I would have pulled, anything with a brown look to it, if you aren't careful they overpower the pretty vibrant colors and make things look muddy.  Some people take the crayons out of the wrappers, I didn't and it seemed to work fine but to each their own.
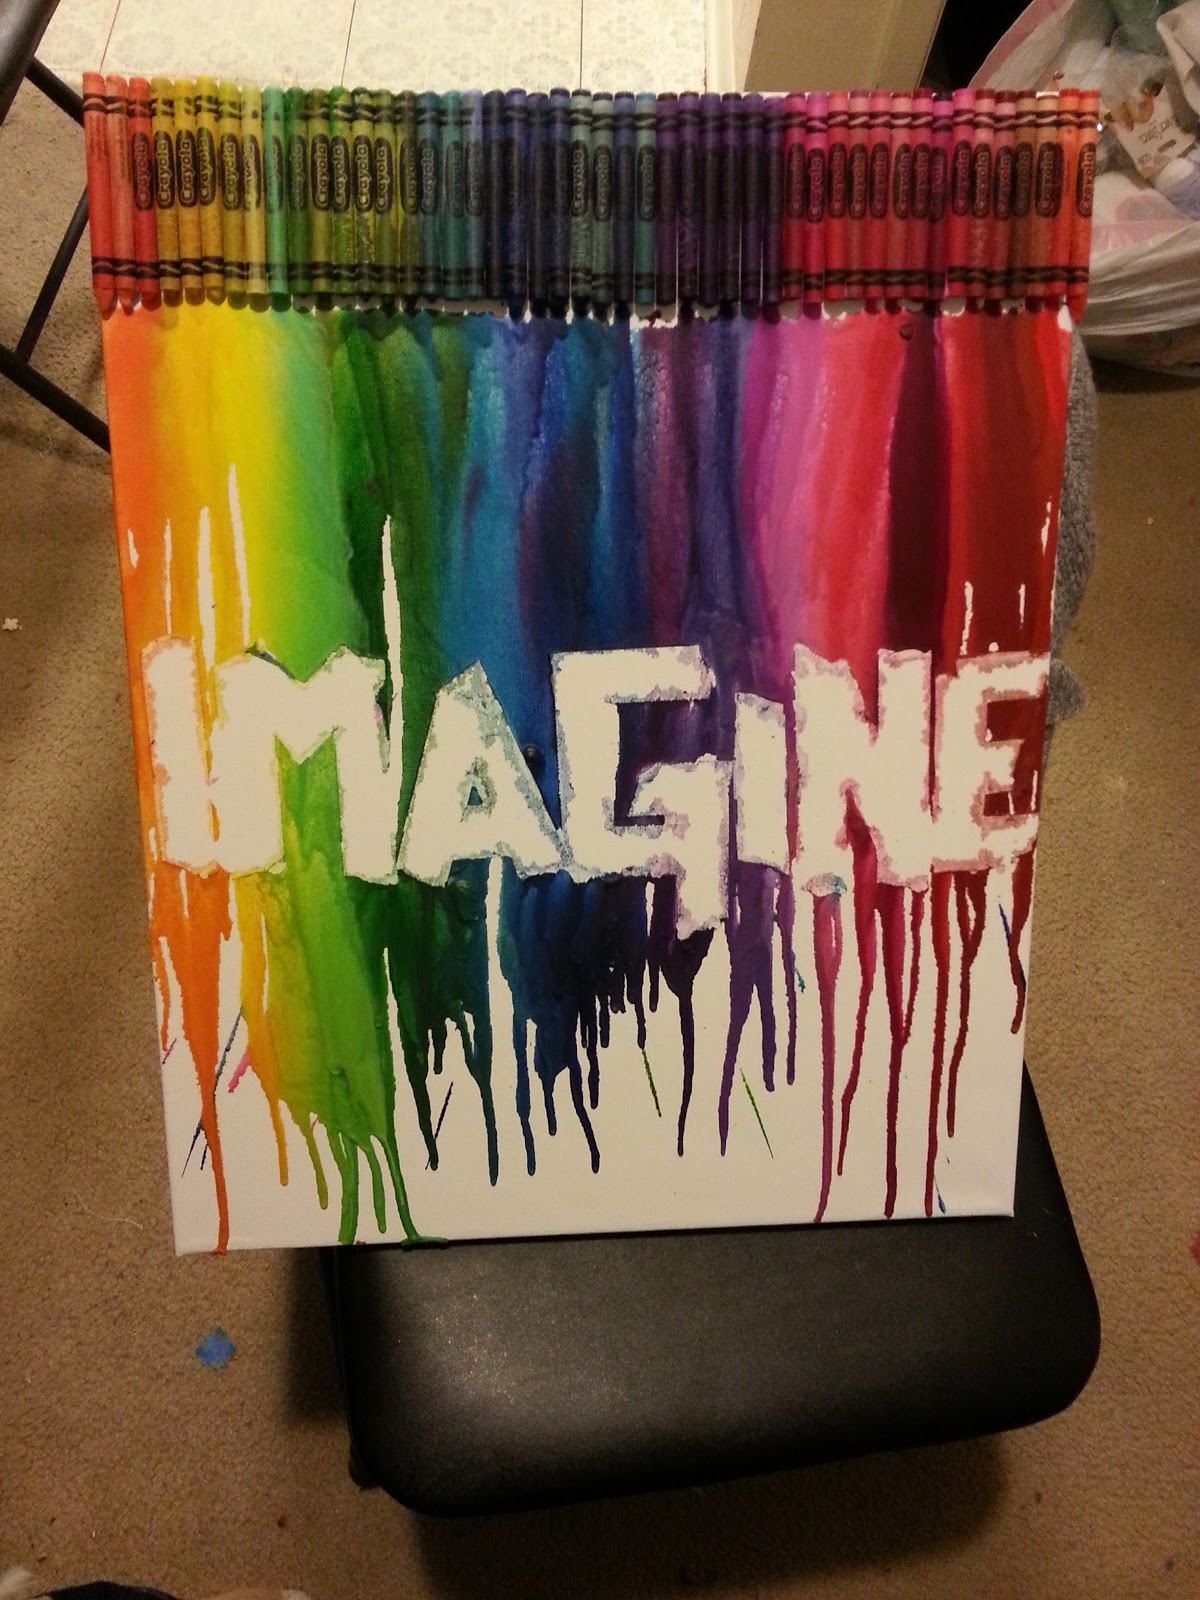
     I taped my word with blue painters tape on the canvas. I made sure all the edges were pressed down, I had to fiddle around with what word I was using and placement, painters tape isn't exactly nimble,someone with more patience and skill might be able to make flowing script with it, I am not that person.  Make sure that in your word you leave space for the max to run over so that when the tape is removed your message will be clear.
     After that it was straight on to the drop cloth and fire up the hair dryer.  I started with the hairdryer on hot /low very close to the crayons, holding the canvass upright. This first bit seemed to take an eternity because you are literally staring at crayons waiting for something to happen. You will see the wrappers begin to change color when the crayon starts to sweat.
     After trail and error I kept the dryer about 4 to 6 inches away from the crayons aimed at their middle pointing down on hot/high swaying the dryer back and forth in a 6 inch swath, once the wax starts to run you will see how going back and forth can keep the dryer from blowing the wax in a slanty direction.
   Pay attention to the drips, if the drips seem like they are flying willy nilly over the canvas adjust your hairdryer to encourage them to go straight down.
     This particular stage takes forever, particularly if you have a bigger canvas and a word that you need to make sure is properly coated.  Mine took about 45 minutes but that was with my fiddling around trying to find a grove so you might be able to do in in 30
     Once I was satisfied that my word was coated I shut off my hair dryer and let the canvas be for a second to make sure everything was dry before I moved it or touched it.
    When it was ready (about 10 minutes after I stopped applying heat) I took a pair of tweezers and an exacto knife to help me peel my painter's tape word off. When possible i lifted the tape with the tweezers or my hands , ensuring all tape was removed, the more I peeled the happier I was with the results.  However there were some letters that had places thickly covered with wax that wouldn't come up without disturbing the wax around it. I lightly traced the exacto knife around words that looked too covered and the slid the knife under the tape to begin pulling it off.  BE VERY CAREFUL with the exacto knife, you do NOT want to puncture the canvass (or your self).
  After pulling off the word (if you did one ) you are done all that is left to do is hang it up! I was very happy with he way mine turned out and it has made be think of other melty crayon projects i might want to do, varying the colors and the canvas size... if you do one please send a picture I would love to see the variations that everyone comes up with!